
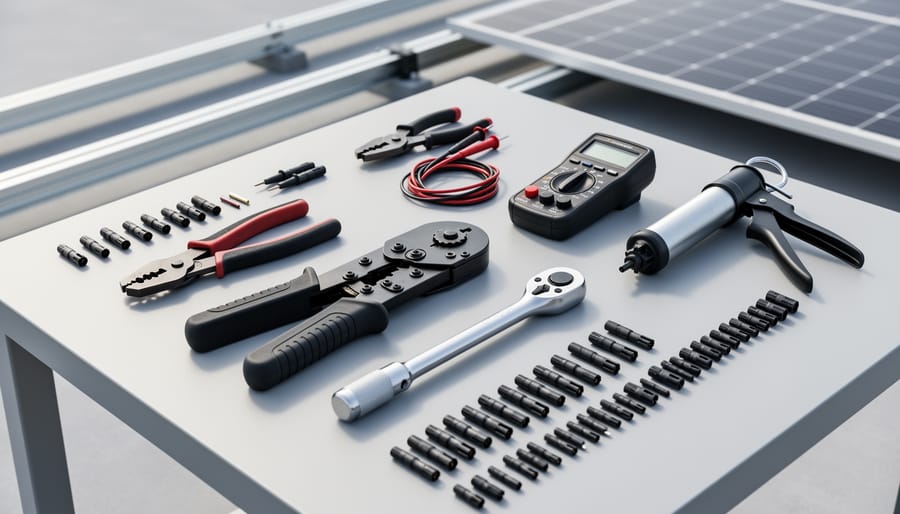
A master tool set for solar installation isn’t just a collection of wrenches and screwdrivers. It’s a carefully selected arsenal designed to handle the unique demands of mounting panels on roofs, connecting electrical systems safely, and ensuring waterproof seals that last decades. The difference between a standard toolkit and a solar-specific master set often determines whether your installation withstands 25 years of weather or starts leaking after the first heavy rain.
Professional installers know that solar work combines three distinct skill sets: roofing, electrical, and mechanical assembly. Your tools need to reflect this reality. You’ll need specialized crimpers for MC4 connectors that create reliable electrical connections, torque wrenches calibrated for the exact specifications of rail systems, and sealants formulated to bond with both roofing materials and aluminum frames without degrading under UV exposure.
The investment in a proper master set pays for itself quickly. A quality crimping tool prevents the callbacks that happen when connections fail. Proper wire strippers designed for solar cable gauges save hours of frustration. Even something as simple as a dedicated solar multimeter with the right voltage range can prevent dangerous mistakes during commissioning.
What makes 2026 different is the emphasis on customization. Cookie-cutter tool sets rarely match your specific installation environment. Roof type, panel manufacturer, and local weather patterns should all influence your selection. Building your own master set around core essentials, then adding specialized tools for your particular projects, creates better outcomes than buying a pre-packaged kit that includes tools you’ll never use.
Quality matters more in solar than almost any other trade because mistakes stay visible for decades.
What Makes a Solar Installation Tools Master Set Different
Working with solar daylighting systems and attic ventilation demands a different approach than typical home improvement projects. While your standard toolbox might suffice for hanging shelves or patching drywall, solar installations require specialized equipment designed for precision rooftop work and weatherproofing challenges that standard tools simply weren’t built to handle.
The primary distinction lies in the environment where these tools operate. Solar installations happen on rooftops, often on steep pitches where every cut, measurement, and seal needs to be exact the first time. Unlike indoor projects where mistakes can be easily corrected, a misaligned skylight opening or improperly sealed solar tube flashing can lead to water damage, energy loss, and expensive callbacks. This reality drives the need for tools that deliver repeatable accuracy under challenging conditions.
Weatherproofing requirements set solar tools apart as well. Standard home improvement projects rarely demand the level of water-tight integrity that a skylight or solar tube installation requires. Solar-specific tools include specialized flashing cutters, precision sealing applicators, and measuring devices calibrated for the exact angles and curves of tubular daylighting systems. These aren’t optional upgrades but essential equipment for preventing leaks that could compromise both the installation and your home’s envelope.
The materials themselves also differ. Solar products often use specialized metals, high-grade plastics, and UV-resistant components that require specific drill bits, fasteners, and cutting tools. A standard hole saw might work for wood, but creating clean openings in metal roofing or cutting through composite solar tube materials demands purpose-built cutting equipment that won’t crack, splinter, or leave rough edges that compromise seals.
Precision measurement tools take on heightened importance too. Solar installations must account for roof pitch, sun angles, and exact positioning to maximize natural light collection and energy efficiency. This means using digital levels, angle finders, and measuring devices that go well beyond the tape measure and bubble level in your garage toolbox.
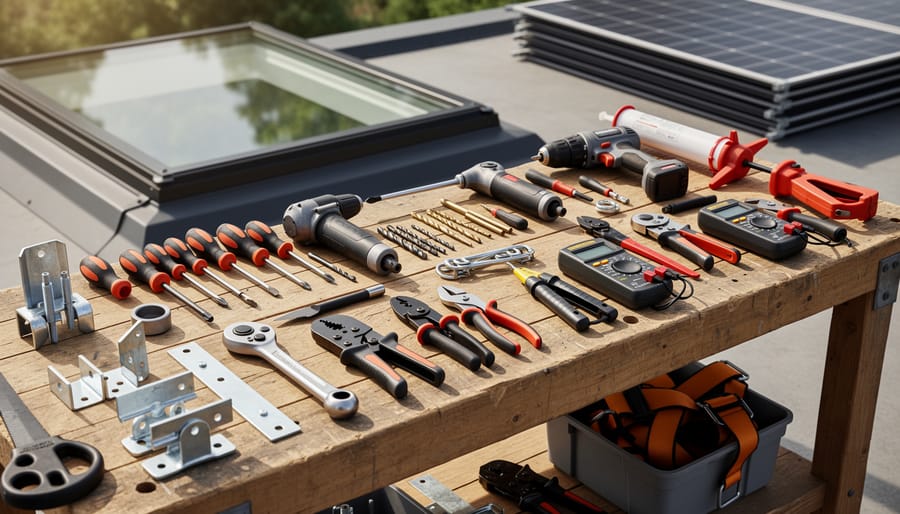
Core Components of the Solar Master Series Security Tools
Cutting and Measuring Tools
Precision cutting and measuring form the foundation of any successful solar installation. When creating openings for skylights or solar tubes, accuracy isn’t just important, it’s everything. A measurement that’s off by even half an inch can compromise the entire installation’s integrity and performance.
Start with a reliable 25-foot tape measure that includes metric and imperial markings. Solar installations often require cross-referencing manufacturer specifications in both systems. Pair this with a quality carpenter’s square and angle finder to ensure your openings align perfectly with roof angles and interior ceiling planes.
For marking, chalk lines and pencil marks won’t suffice on their own. Invest in a good straightedge and marking knife for precise lines on both roofing materials and drywall. These create crisp guidelines that won’t smudge or fade as you work.
Hole saws represent your primary cutting tool for creating circular openings in roof decking and ceiling surfaces. A variable-speed drill paired with carbide-tipped hole saws in common solar tube diameters (10, 14, and 21 inches) covers most residential applications. For rectangular skylight openings, a quality reciprocating saw with metal-cutting blades handles both wood framing and occasional metal flashing encountered during installations.
Keep multiple blade types on hand, rough-cut for framing work and fine-tooth for finished surfaces where clean edges matter. Sharp blades reduce material tear-out and make installations cleaner and faster.
Sealing and Weatherproofing Equipment
Proper sealing separates a successful solar installation from one that causes years of headaches. Water infiltration around skylights and solar tubes ranks among the most common installation failures, making weatherproofing equipment essential to your master set.
Start with high-quality caulking guns designed for consistent bead application. You’ll need both standard and skeleton guns, the latter works better with larger tubes of specialized solar sealants. Choose guns with smooth pressure releases to prevent overrun and messy applications.
Solar-rated sealants form the foundation of weatherproofing work. Stock both polyurethane and silicone varieties, as different materials and conditions require specific formulations. Polyurethane excels for flashing and sealing penetrations in most roofing materials, while silicone handles high-temperature applications around metal components.
Include professional-grade flashing tools: aviation snips for cutting custom flashing pieces, seamers for creating neat folds, and hand brakes for forming precise angles. Pre-formed flashing kits simplify standard installations, but custom projects demand the flexibility to fabricate on-site.
Add a heat gun to your weatherproofing arsenal. It activates self-adhesive flashings, softens stubborn old sealants during repairs, and helps contour materials to irregular surfaces. Pair it with plastic spreaders and putty knives in various widths, metal tools can damage delicate flashing materials.
Finally, keep weatherproofing inspection tools handy: flashlights for checking seal integrity, spray bottles for water testing, and moisture meters for verifying dryness before sealing. Catching issues during installation beats emergency repairs during the first rainstorm.
Mounting and Fastening Tools
Secure mounting requires tools that can handle both the precision demands of solar installations and the structural requirements of roof work. A quality cordless drill with adjustable torque settings is your primary tool, allowing you to work efficiently without being tethered to power sources during rooftop installations.
Impact drivers prove essential when driving lag bolts and specialty fasteners through roofing materials and into structural supports. Unlike standard drills, they deliver the torque needed without stripping screw heads or over-tightening delicate components. Look for models with LED work lights built in, as solar installations often require work in dim attic spaces.
The real difference in a solar-focused set lies in the specialty fasteners. Stainless steel screws resist corrosion from weather exposure, while self-sealing fasteners incorporate rubber washers that compress to create watertight seals. Many professionals keep a magnetic bit holder and multiple bit types readily accessible, as switching between pilot holes and final fastening happens frequently.
Socket sets designed for hex-head bolts common in mounting brackets round out your fastening toolkit. Choose sets that include both metric and standard sizes, as solar equipment manufacturers use varying specifications.
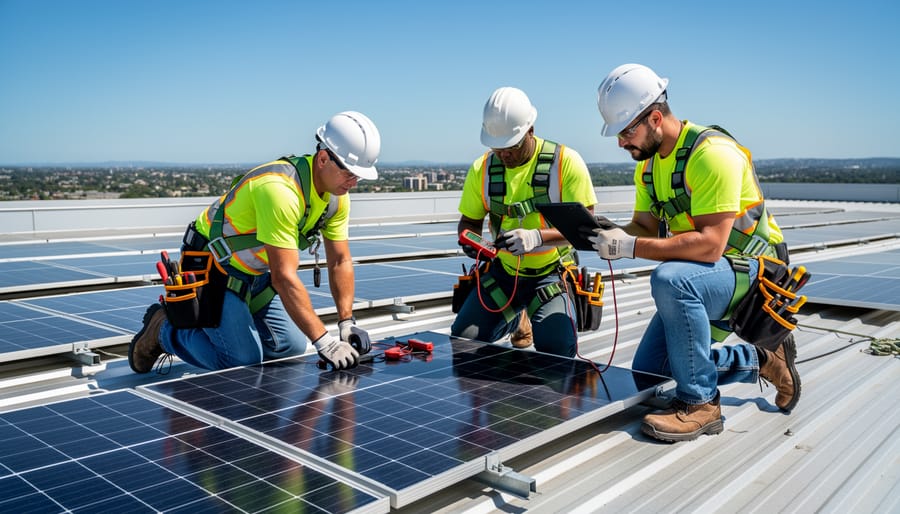
Safety and Access Equipment
Working on a roof demands attention to safety that goes well beyond the installation itself. Before you even think about cutting or mounting, you need reliable access and protection equipment that keeps you secure while working at height.
A sturdy extension ladder rated for your weight plus tools is non-negotiable, and roof brackets or ladder stabilizers prevent damage to gutters while giving you stable positioning. For extensive projects, consider investing in a harness system with proper anchor points, professional installers wouldn’t work without one.
Personal protective equipment matters just as much. Safety glasses protect against debris when cutting openings, while work gloves with good grip prevent slips and cuts. Non-slip footwear designed for roofing provides crucial traction on pitched surfaces, especially when carrying tools or materials.
Don’t overlook weather considerations either. Working in wet conditions or extreme heat increases risk substantially. Plan installations during mild, dry weather whenever possible, and always have a spotter available when working on steeper roof pitches. These precautions might seem basic, but they’re what separate successful installations from dangerous situations.
Choosing the Right Tools Master Set for Your Project
Selecting the right tools master set starts with an honest assessment of your installation scope and frequency. A homeowner planning a single skylight installation needs a different kit than a contractor running three solar tube projects per week.
Start by identifying your primary applications. Will you focus mainly on solar attic fans, or do you need versatility across skylights, solar tubes, and ventilation systems? Professional installers benefit from comprehensive sets covering all scenarios, while DIY homeowners can build targeted kits around specific projects. Consider the scale too: residential installations require different reach and capacity than commercial work.
Your skill level matters significantly. First-time installers should prioritize tool sets with clear instructions and forgiving margins for error. Experienced contractors, by contrast, need precision instruments that deliver repeatable results across dozens of installations. Don’t overinvest in professional-grade equipment if you’re tackling one project, but equally, don’t compromise on safety tools regardless of experience level.
| User Type | Essential Tools | Optional Add-ons | Investment Level |
|---|---|---|---|
| DIY Homeowner | Basic drill set, measuring tools, sealant gun, safety harness | Specialty hole saws, angle finder | $200-500 |
| Occasional Contractor | Mid-range drill/driver combo, full measuring kit, professional sealants, weatherproofing tools | Laser level, inspection camera | $500-1,200 |
| Professional Installer | Complete cutting suite, precision measuring systems, full weatherproofing arsenal, comprehensive safety gear | Specialized fasteners, custom jigs | $1,200-3,000+ |
Customization represents the smartest approach for most buyers. Rather than purchasing pre-packaged sets that include tools you’ll never use, build your master set around core essentials, then add specialized equipment as projects demand. This strategy delivers better cost savings than buying comprehensive kits upfront.
Think about future expansion when making selections. If you’re installing solar tubes now but considering solar shingles vs panels later, invest in versatile tools that adapt across applications. Quality cordless drill platforms with interchangeable batteries and accessories grow with your needs without requiring complete replacement.
Budget considerations extend beyond initial purchase price. Calculate the cost per use for expensive specialty tools. Renting makes sense for equipment you’ll use once or twice annually, while frequently-needed tools justify higher upfront investment. Factor in replacement costs too: cheaper tools that fail mid-project often cost more in delays and callbacks than quality equipment purchased initially.
How Quality Tools Enhance Your Solar Installation Results
Quality tools transform solar installations from adequate to exceptional. When you invest in precision equipment designed specifically for solar work, you create weathertight seals on the first attempt rather than returning to fix leaks six months later. Professional-grade cutting tools produce clean openings that align perfectly with skylight frames, eliminating gaps that compromise energy performance.
The financial logic becomes clear quickly. A quality drill with proper torque control prevents overtightening that cracks flashing materials, while precision measuring tools ensure accurate placement before you cut into roofing material. These seemingly small improvements prevent callbacks that consume time and erode profit margins. Homeowners avoid the disruption and expense of repairs, and installers build reputations that generate referrals.
Energy efficiency depends directly on installation precision. When sealing tools apply consistent pressure and create uniform barriers around solar tubes or attic fans, you eliminate thermal bridging and air infiltration. Poor-quality tools produce inconsistent results that show up on your savings calculator as underperforming systems that never deliver promised reductions in heating and cooling costs.
Durability matters beyond individual projects. Well-made tools withstand years of rooftop conditions without degrading, reducing the environmental impact of manufacturing replacements. You avoid sending worn-out equipment to landfills every few seasons. This sustainability extends to installation outcomes: systems installed with precision tools maintain their performance specifications longer, delivering sustained energy benefits rather than declining efficiency.
Consider how tool quality affects complex decisions. When evaluating different solar solutions, understanding proper installation requirements becomes part of assessing true panel vs shingle ROI. Quality tools ensure whichever system you choose performs as designed, protecting your investment through accurate, lasting installation work that supports your sustainable building goals.
Maintaining Your Solar Installation Tools for 2026 and Beyond
Proper tool maintenance protects your investment and ensures consistent performance across every installation. Solar tools face unique challenges, exposure to weather during rooftop work, contact with sealants and adhesives, and frequent temperature changes, making regular care essential.
Clean tools immediately after each use. Remove sawdust, sealant residue, and debris before they harden. For cutting tools, wipe blades with a dry cloth, then apply a light coat of tool oil to prevent rust. Metal surfaces exposed to moisture during outdoor installations need particular attention.
Establish a routine maintenance schedule that keeps your tools ready for action:
- Inspect all tools before storing them, checking for damage, wear, or parts that need replacement.
- Clean thoroughly using appropriate methods for each tool type, metal brushes for drill bits, soapy water for handles, specialized cleaners for power tool housings.
- Lubricate moving parts, hinges, and adjustable components with appropriate oils or greases.
- Sharpen or replace cutting edges on hole saws, utility knives, and other bladed tools.
- Charge batteries fully and store them according to manufacturer specifications, typically in cool, dry locations.
- Organize tools in dedicated cases or storage systems where each piece has its place.
Store your master set in a climate-controlled environment when possible. Extreme temperatures and humidity accelerate wear on both metal components and power tool electronics. Wall-mounted organizers or dedicated toolboxes prevent tools from knocking together, which damages precision edges and calibration.
Choose eco-friendly maintenance products aligned with your sustainability values. Plant-based lubricants, biodegradable cleaners, and reusable cleaning cloths reduce environmental impact without compromising tool performance. When tools reach end-of-life, recycle metal components and dispose of batteries through proper channels. Well-maintained tools last decades rather than years, reducing waste and supporting long-term sustainability goals while ensuring you’re always prepared for the next installation.
Investing in the right tools master set isn’t just about completing your solar installation, it’s about doing it right the first time. Quality tools designed specifically for solar applications ensure proper sealing, accurate measurements, and secure mounting that directly impact your system’s performance and longevity. When you’re making decisions about solar improvements and comparing options like which saves more remember that the installation quality matters just as much as the product choice.
The tools you choose today become part of your sustainable building toolkit for 2026 and beyond. Durable, well-maintained equipment reduces waste, supports multiple projects over time, and helps you achieve the energy efficiency goals that make solar installations worthwhile. Whether you’re a professional installer managing commercial projects or a homeowner tackling your first skylight installation, matching your tool set to your specific needs ensures better outcomes and supports your commitment to sustainable practices. Start with the essentials, expand as your skills grow, and always prioritize quality over shortcuts.